


Draw Springtrap with only six simple tasks! The Five Evenings at Freddy’s series started unobtrusively with one game; however, it is currently one of the world’s most unmistakable ghastliness game establishments. He has a thought that presumably comes to many people’s brains. You may also learn many things cartoon drawing, scary drawing, cartoon drawing, coloring pages for kids cute drawing, flowers drawing, cute drawing, puppy drawing, and dog drawing.
Imagine a scenario in which you see frightening animatronics, all things considered, eateries and attractions. The series is loaded with these rampaging mechanical reptiles, and one is just about as alarming as Springtrap, the rabbit. Since he is the most unmistakable person in the series, many fans love figuring out how to draw Springtrap. On the off chance that you honestly love this terrifying robot rabbit, you have come to the perfect location.
Our bit-by-bit guide on the most proficient method to attract Springtrap, with only six stages, will show you how fun and simple it may be.
The most effective method to attract Springtrap 6 stages
Share
Step-by-step instructions to draw Springtrap – how about we begin?
1 stage
Instructions to draw Springtrap 1 stage To kick off your Springtrap drawing, draw the head and ears blueprint. Regardless of whether it is made sense in more detail, these lines will be very basic. The reference picture displays the use of unpredictable smooth ovals to frame his head. Then, at that point, we will have rabbit ears. The stepping stool looks exceptionally harmed and old and shows in his ears. The lower half of the left ear will adhere to the upper ear when broken. The right ear will turn into somewhat more flawless, yet just barely. When these ears have framed into the state of your head, you can continue toward stage 2.
Stage 2 – Get Springtrap.
the most effective method to draw spring trap level 2 When you play a game in this series, the dreadful substance of one of the animatronics will presumably appear before your face. Consequently, the game designers put a ton of exertion into making the countenances charming and dreadful. We should draw an unpleasant face for this piece of your Springtrap drawing. The eyes are round, with marginally hanging eyelids. His nose will be extremely level and round; then, we will involve wavy lines for the grin at that point. His mouth has straight teeth. To finish this step, draw a couple of little shapes for her shoulders and utilize a couple of additional bent lines to begin the body. I’ll do that from time to time. You can continue toward stage 3.
Stage 3 – Presently, draw a few things on the stomach.
the most effective method to draw Springtrap Level 3 Many easily overlooked details show how worn and harmed a person like this looks, and we’ll turn out some of them in this bit-by-bit Springtrap. Utilize a bent line to frame the highest point of the stomach, and afterward, draw a few little round shapes to show a portion of the items jutting from inside the body. Then, at that point, you’ll be prepared to add more body parts to Springtrap when we continue toward the following stages.
Stage 4 – Then draw the arms and other body parts.
instructions to download Springtrap 4 stages When your Springtrap is drawn, we’ll take out your weapon next. Like the remainder of his body, the arms are combined from a few more modest pieces. Lower shapes isolate These round shapes from the shoulders, and the arms are pulled towards their finishes. Make certain to add considerably more harm to every one of his arms.
When the arms are finished, you can draw a couple of additional shapes for her midsection and the beginning of her legs before we continue toward the last subtleties of the instructional exercise.
Step 5 – Add the last subtleties to the Springtrap drawing.
Instructions to download Springtrap 5 stages You are prepared to finish the last strides in this step of our instructional exercise on the best way to draw Springtrap. You began attracting the legs in the past part and are presently getting done withdrawing them. Once more, these legs are intended to interface various segments together. Likewise, a few misfortunes in the legs and the feet will be defined along the boundaries of the bones so they will look broken.
Before continuing toward the last step, make certain to add extra data! You can offer a spot to grandstand your #1 game scenes or add some companions from the genuine left-wing veristap. These are only a couple of thoughts; however, what else might you consider to finish this?
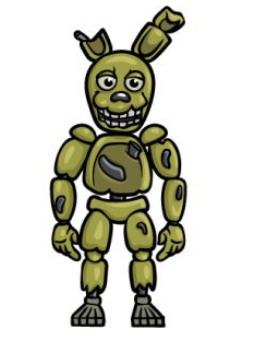
Stage 6 – Finish spring trap drawing with Variety
the most effective method to draw level 6 Springtrap The last step of drawing Springtrap is giving him tone. Springtrap is normally shaded a light orange in the games, which is what we were going for in our specialty. We’ve changed the utilization of light and dull varieties to give some variety so you can adopt a comparative strategy to your picture.

